


If you must move your PST files into Microsoft Office 365, then it is a challenging task. It requires users to devote their time and resources to import PST to Office 365; however, with good supervision and support, the chances of migration success become higher. In this article, we have elaborated on certain solutions to make the migration quicker.
Whenever the organization requires to move their mailboxes which are on-premises, into the cloud (Office 365), the company needs a migration solution. They can import PST to Office 365 by selecting any of their preferred methods. But due to the availability of several options, most of the user gets confused. So this write-up aims to educate users about the solution that suits them and allows them to finish their work without facing any issues.
Import PST files into Office 365: Quick Ways
There are multiple ways by which one can import PST to Office 365, but before getting into we will brief you about the reasons behind the migration. Many organizations look to move towards Office 365 to safeguard themselves from losing their data due to corruption issues, among others. Office 365 comes with lots of inbuilt applications that provide multiple benefits to the users.
We have shared the manual solution through which users can move their PST files to Office 365, but make sure to select the method that fulfills your requirements. However, we have prepared a list of methods that will make users import their PST files:
- Network Upload Method
- Drive Shipping Method
Network Upload Method
Before starting the process, users need to add a new role in the admin center to assign the mailbox import export role. Make sure you log in with the admin credential as part of them. No one can complete this task. Kindly follow the steps shared below to create a new role in EAC.
- Login into the new EAC with the required credentials. Now visit the role and then the admin role. Click on add role group.
- Users require adding certain details on the role group page to set the new role. Enter details such as name, description, and scope.
- Now in the add permission section, users will need to pick out the desired role; in this case, select mailbox import-export. Click on next.
- Subsequently, select users which you need to add on.
Part 1 Upload PST file to Azure Storage Location
- Click here to open the page where you will need to log in with the required admin credentials.
- The compliance portal page will open where you need to look for data lifecycle management, select Office 365 and click Import.
- Now, the import job wizard will appear, click on + new Import role and then mention the name for the import job.
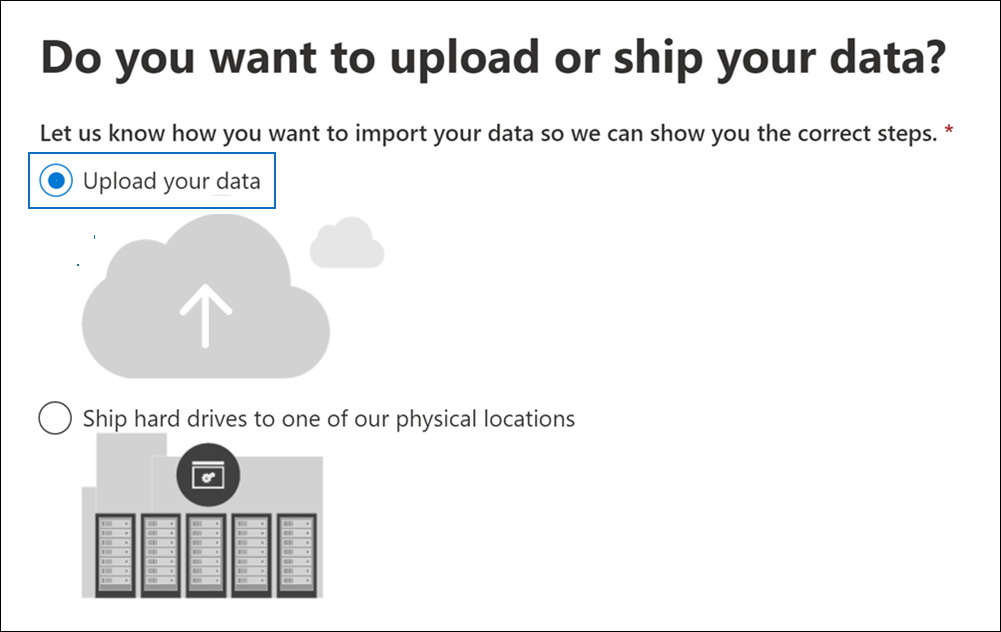
- A new window will appear, which is, Do you want to upload or ship data? Make sure to select the Upload to Data option and move further.
- You need to click on Show network upload SAS URL in the Import data window. Once you see the key, kindly click on copy to save it in your clipboard. Then move to step 3, where you must click Download Azure AzCopy.

Part 2 Uploading of PST files into Azure Storage
To start uploading the files, you need to start following certain steps, which are as follows:
- Copy the PST file folder to the same location where the tool has been saved.
- Now you need to open the command prompt and use the ‘cd’ command. Go to the folder where the tool has been saved.
- Use the command below to move the PST file into the Azure location.
azcopy.exe copy “< PST files location>” “<SAS URL>”
After that, it will be required to map the PST files and then, later on, create the import job. So, by doing so, the task to migrate PST to Office 365 will get over.
Driving Shipping Way to Import PST files to Microsoft 365
In this method, to import PST to Office 365, the user would need to send the PST file to one of the Microsoft locations to upload them into Azure storage. However, Microsoft will charge 2$ for uploading 1 GB of PST file. Also, it is recommended not to share PST file sizes of more than 20GB.
After that, once the PST upload to the required location, the user needs to create the import job and, this time, select ship hard drive to our location. This will take more time than other methods to migrate PST to Office 365 account.
The two methods which we have listed above have many downsides that users should be aware of. Non-tech users will find it difficult to alone import PST to Office 365, and there will always be the risk of losing data. Moreover, it consumes a long time to complete the process. So instead of them, kindly look for solutions that provide an easy route to complete the migration.
Easier and Direct Solution to Move PST into Office 365
We have gone through some of the manual migration methods, but all of them have somehow failed to deliver. So users who are looking for a quicker way to import PST to Office 365 will get a solution here. Third-party migration software fits in this regard, which has the capability to beat the performance of the manual solution.
Shoviv PST to Office 365 migration tool performs really well when it comes to moving data from the PST files into Office 365. Due to its easier user interface, users will not face any issues while migrating. User can simultaneously add their multiple PST files and import them into Office 365. To know about more features of this software, check them below:
- It offers an easier way to connect with Office 365 in order to fetch mailboxes from them. Also, this software will allow users to migrate their PST files into Office 365 primary mailbox, archive mailbox or archive mailbox.
- The software comes with advanced data filter options. Users can include and exclude their data using several data filter criteria.
- Users can also utilize the software Folder Mapping options which help them to move the data from the required folder of the PST file into Office 365.
- The incremental export option of this software, when applied then it will make sure to move only the new PST file item whenever the user resumes the interrupted process.
- Due to it’s include folder/subfolder option, users can choose to add or remove the required folder from the PST files.
- Users can download the report of the complete process after the software finishes the task in HTML format. The report will include details such as total item process, failed item count, filtered items, source and target folder.
- The free evaluation version of this software allows us to test its capabilities. Users can be able to process the first fifty items from each folder.
Final Remarks
This blog aims to highlight the multiple methods that users can optimize while moving their PST files into Microsoft 365. However, the manual method explained here to import PST to Office 365 is a little bit challenging to use; it is better to look for professional software to overcome such problems. Kindly make sure to use its free demo version to figure out that software will work according to your expectation or not.